The Focaccia Clock
Two schedules for the same olive oil dough, with a baker's guide to the bubbles, folds, and dimple marks that tell you when it is ready.
8 min read
The focaccia that goes into the oven at seven can start after breakfast or the evening before. Either way, the useful part of a schedule is the window it gives you for dinner. The dough has its own sequence: first it strengthens, then it traps enough gas to stand up in the pan, then it relaxes enough to take the imprint of your fingers. If the clock says to move on and the dough still springs back like a rubber band, you can use the extra ten minutes to find a serving board or wash the bowl.
A straight-sided bowl makes the first stage easier to follow. Lightly mark the starting level with a piece of tape on the outside. Later, after you tip the dough into its pan, put away the tape. The pan gives a much better view of what matters during the final rise: whether the corners are filling in, whether tiny bubbles are collecting at the sides, and whether the whole mass trembles a little when the pan shifts.
A dough you can make twice
For one 23 by 33 centimeter or 9 by 13 inch metal pan, use 500 grams bread flour, 385 grams water, 10 grams fine sea salt, 3 grams instant yeast for a same-day bake or 2 grams for an overnight rise, and 20 grams olive oil for the dough. Have another three to four tablespoons of oil for the pan, your hands, and the surface. Use flaky salt and perhaps a few rosemary leaves to finish. A scale is especially handy for the flour and water. A cup of flour scooped straight out of a bag may weigh much more than one that has been spooned into the cup.
Stir the flour, instant yeast, and fine salt in a large bowl. Pour in the water and the 20 grams of oil. Mix until every patch of flour is damp, scraping the bottom with a flexible spatula. You should have a shaggy mass that slumps slowly when left alone. Cover the bowl. After about twenty minutes, the flour will have absorbed more water and the dough will feel more coherent when you pull on it. That change comes from the rest, so leave the counter flour in its jar.
Bread flour makes this amount of water manageable. To use ordinary all-purpose flour, start with 365 grams water and work in a little of the reserve after the initial rest if the dough feels firm. In a cool kitchen, room-temperature water will work. In a hot kitchen, water straight from the cold tap gives you more time between the early signs of growth and the point at which the dough needs attention.
What a fold feels like
Dip one hand in water. Slide your fingers under the dough at the far side of the bowl, lift until you feel resistance, and lay the lifted portion over the middle. Rotate the bowl and repeat until you have made four folds. Stop if the dough starts tearing. Cover the bowl and give it roughly twenty minutes before the second set. Another rest and a third set usually bring the surface to a satin sheen. It should lift as a sheet with a little weight behind it.
During the first round the dough may break at the edges of your fingers and slide back into the bottom of the bowl. By the third, you might be able to lift a flap far enough to see light through a few thinner spots. That is enough. Keeping your hand damp makes a bigger difference here than keeping the folds symmetrical. If a few wet drops fall into the bowl, they will disappear into the dough.
The folds are also a handy place to check whether your flour suited the recipe. Dough that barely stretches and then snaps can benefit from a longer pause. Dough that spreads into a flat puddle between every fold may need a fourth set. If you pour in more flour at this stage, it can leave pale streaks in the crumb. The pan can support a loose dough better than a countertop can.
Same day for an early dinner
For a bake around six, begin mixing by noon in a kitchen around 22°C or 72°F. Finish the folds by about one. Let the covered bowl sit until the dough looks noticeably fuller, with a round shoulder at the edge and small bubbles visible through the side. Expect something close to half again its starting volume, although the best evidence is how airy it feels when you nudge the bowl. Start checking after an hour. A cooler kitchen may move this part well into the afternoon.
Generously oil the pan, including the corners. Ease the dough out with a flexible scraper and let it settle in a heap. Slick your fingertips, coax it outward a little, and wait. In twenty minutes you may find that a pass with a few fingers will take it the rest of the way. Cover it loosely so the top stays supple. Look for a slightly uneven surface with little blisters, a rounded edge, and a gentle jiggle. Allow roughly an hour or two after transfer, and leave yourself room on either side of that estimate.
If you need the loaf on the table at six precisely, aim to have it out of the oven before five forty-five. Bread can wait on a rack better than a bowl of soup can wait on the stove. Start the oven while the pan still looks a little short of ready. A fully hot oven makes the final decision about the dough easier to take at the right moment.
Overnight for a lighter morning
Mix after dinner with the smaller amount of yeast and do the folds while the kitchen is still in use. Give the dough about twenty minutes at room temperature after the last fold, then cover the bowl tightly enough to prevent the surface drying and put it in the refrigerator. A shelf well away from the door is useful if the refrigerator gets opened often. By morning the dough should show some bubbles and expansion, though a very cold refrigerator can leave it looking quiet.
For a lunchtime loaf, check it around breakfast. If it looks fairly aerated, move it into the oiled pan straight from the refrigerator. Its first stretch may be short and clumsy because cold dough takes longer to relax. Return after half an hour and spread it farther. Give it another hour or two at room temperature, longer in a cold room, until the corners look full and the center has some movement. If the bowl scarcely changed overnight, wait for some growth on the counter before turning it into the pan.
A bowl that comes out of the refrigerator very full deserves gentle handling. Let gravity do as much of the transfer as possible. It can also be ready to bake sooner after panning, especially in a warm kitchen. Look for a dough that can still hold its shape under your hand. A surface that wrinkles and sinks all around a tiny touch is a reason to heat the oven and proceed without a long final wait.
The last five minutes before the oven
Preheat to 220°C or 425°F with a rack near the middle. Drizzle the risen dough with enough oil to make your fingertips glide. Spread your fingers and press straight down through the dough in a handful of places, leaving a few areas undisturbed. You can feel the bottom of the pan through a thin cushion of dough. An oiled finger releases cleanly. When it comes back out, each hollow should stay visible, even if it rises a little around the edges. A deep dimple carries some of the oil into the bread and leaves a pale pocket beside the browned ridges.
Scatter flaky salt and a few rosemary leaves. Dry rosemary can scorch on the surface, so let the fresh leaves pick up a little oil and press any that stick up into a dimple. Keep heavier toppings sparse and drain off their liquid. A blanket of wet sliced vegetables can insulate the dough while the uncovered edges finish early. For the first comparison between schedules, the simplest topping is also the easiest way to see what changed in the bread.
Bake about 23 to 30 minutes until the ridges are deep gold, the corners pull back a little, and the bottom looks browned when you lift one edge with a thin spatula. Move the pan lower for the last few minutes if the top is already dark and the underside needs color. Let the loaf sit for five minutes, then lift it onto a rack so the bottom stays crisp. Give the steam a few more minutes to escape before cutting.
Read the crumb the next morning
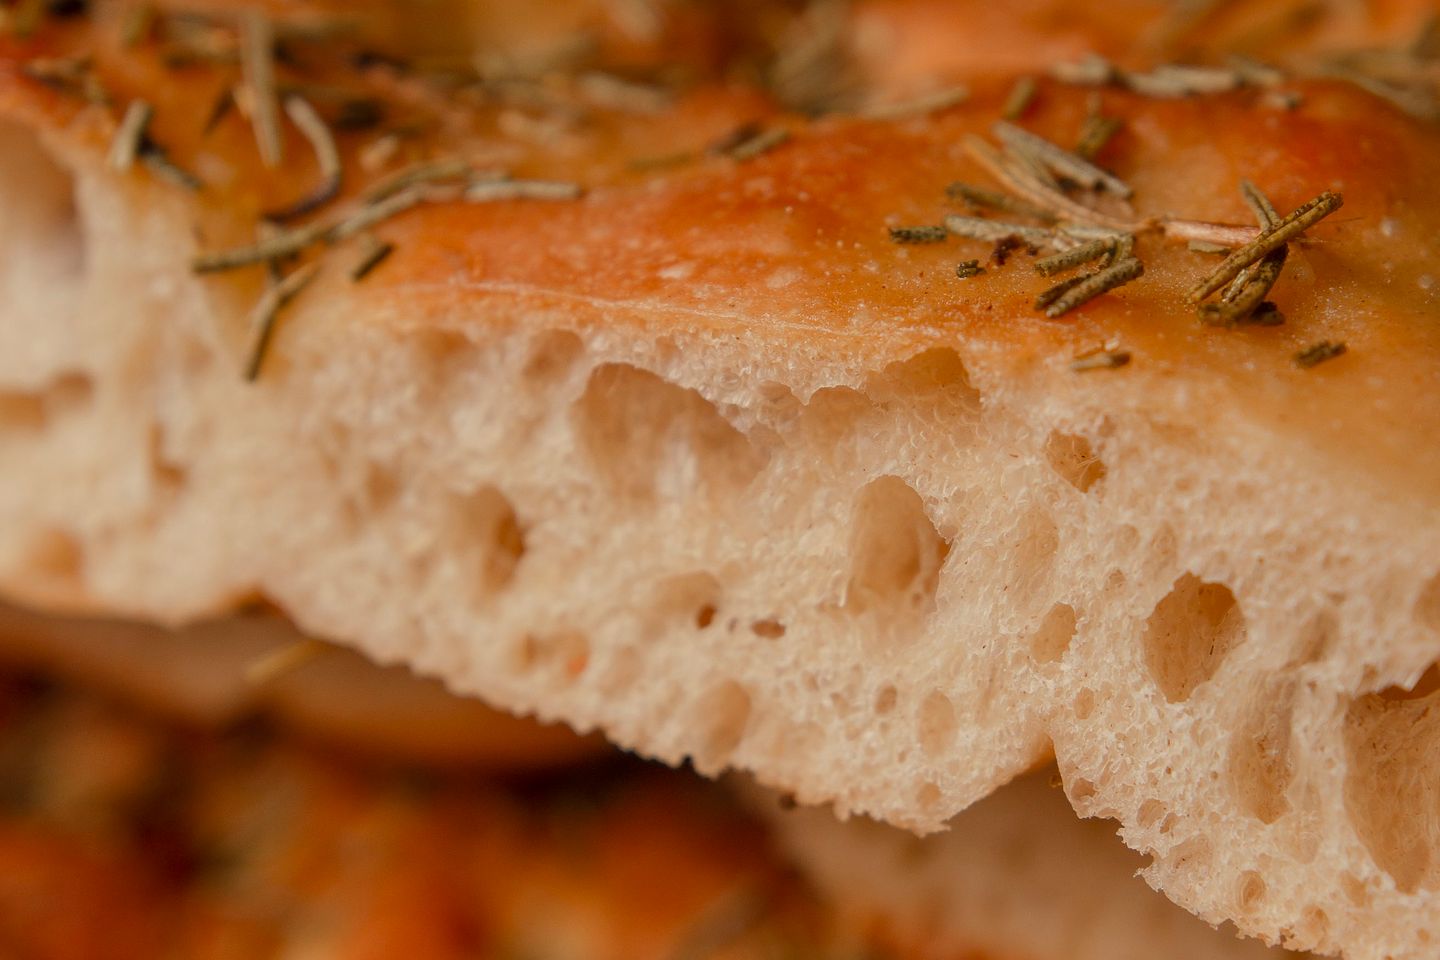
Slice through the middle and through a corner. The corner usually has the best crunch because it touched two sides of the oiled pan. The middle is where you can see the path the dough took. A compact strip at the base with a few huge pockets above may mean the dough went into the oven too early or the bottom lacked heat. A uniformly flat, very fragile loaf may have gone too far in its final rise. If it tastes good but your dimples disappeared, the dough may simply have needed more time to relax before you pressed them.
Try the same pan and flour for the two schedules. Take one picture just before dimpling each time and another when you cut the center. Those four images give you a useful record even if your notes contain little more than the time and room temperature. The dough that seemed slow after lunch may have made the more open crumb. The overnight loaf may have taken more counter time than you expected. You can choose your favorite based on the hours you actually have.
Wrap what remains after it cools. The next day, revive squares briefly in an oven or toaster oven, or split them for sandwiches and toast the cut sides in a pan. The underside crisps quickly when it meets dry heat. That small advantage belongs to both versions, whatever time the dough first went into the bowl.