What a Meringue Needs
Turn a small bowl of egg whites into crisp meringues by watching the foam, choosing a useful shape, and letting the oven do the drying.
8 min read
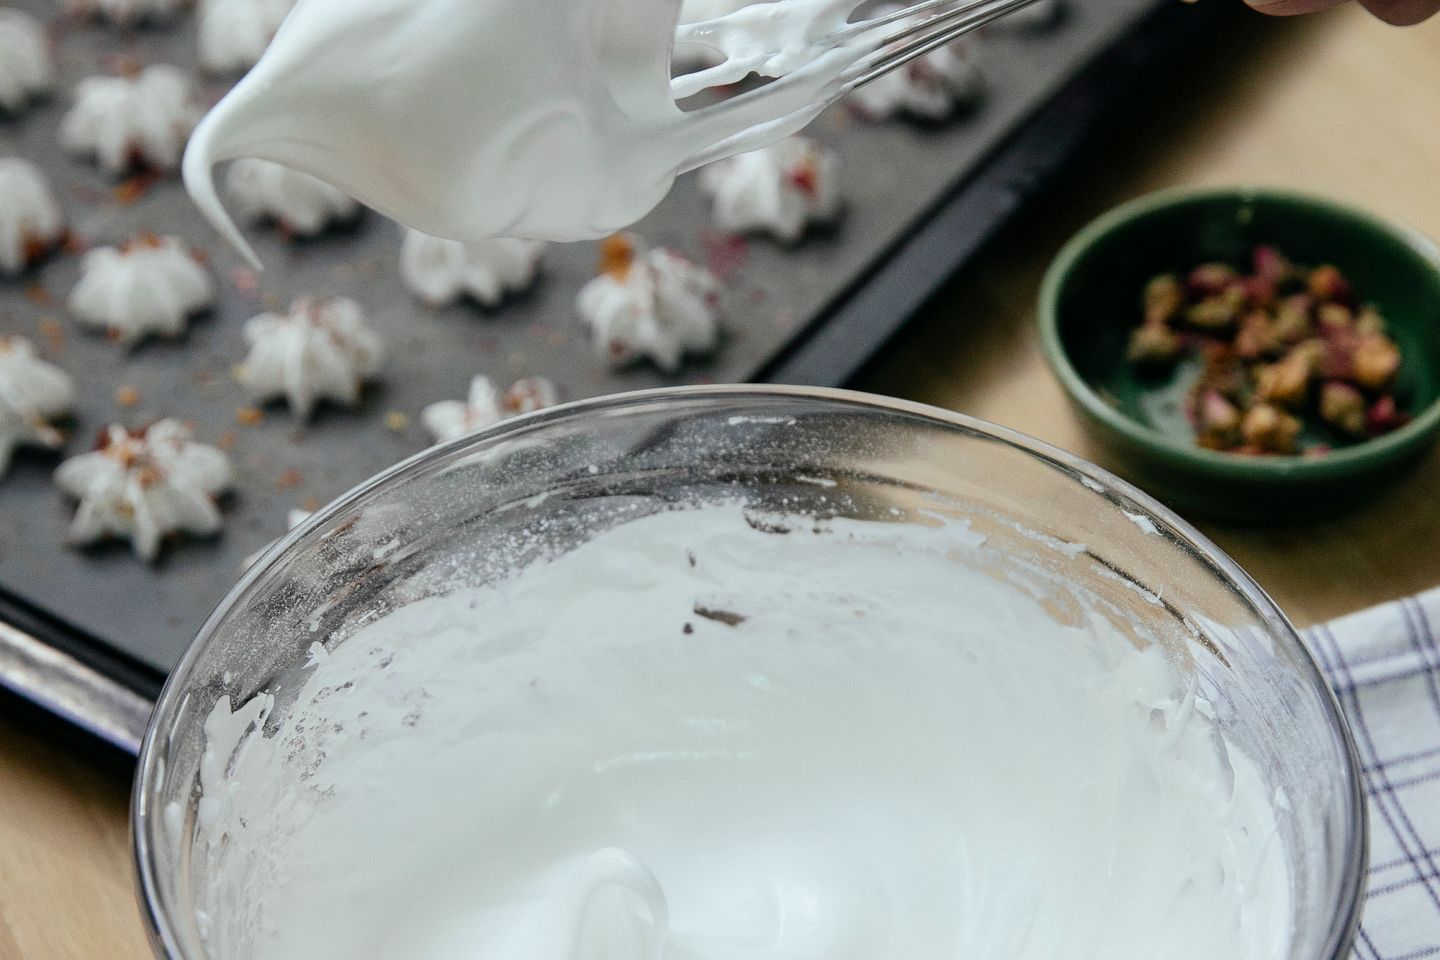
A tray of meringues begins with a thin layer of egg white that barely covers the bottom of a mixing bowl. As the whisk moves, the first bubbles are large and irregular. A few minutes later, the surface looks as fine as paint and the whisk leaves tracks. If you lift it too early, the tracks close while you watch. If you wait until the foam is just strong enough, the tracks look almost cut into it. That is the difference between a puddle that spreads on the baking sheet and a mound with a top that looks the same when it comes out of the oven.
There are ways to make meringue with heated sugar or a bowl over warm water. Small crisp cookies offer a good reason to begin with the simple kind made by whipping sugar into whites. There is enough time to stop and look between additions. If you spoon one cookie a little bigger than its neighbors, the result can tell you how much of the cooking time was really spent drying the middle.
Start with the bowl and whisk
For one tray, use 75 grams of pasteurized egg whites from shell eggs, or use a pasteurized carton product labeled suitable for whipping. Have 145 grams superfine sugar and a small quarter teaspoon of cream of tartar. A clean, dry metal or glass bowl works well. If you use a hand mixer, pick a bowl narrow enough for both beaters to make contact with the shallow pool of whites. In a stand mixer, check that the whisk actually reaches a small quantity in the bottom. A larger bowl is convenient after the foam grows, but it can be a disadvantage at the start.
Separate shell eggs one by one over a small bowl before transferring the whites to the mixing bowl. If a yolk breaks, you can save that egg for another cooked dish and start the next one with a clean bowl. A trace of grease or yolk can make it difficult for the whites to build a stable foam. Scrub and dry the whisk, too, especially if it was used for butter or cream earlier in the day. Keep the eggs refrigerated until you are ready to work with them and follow the storage directions for any pasteurized carton.
Heat the oven to around 100°C or 210°F and line a flat tray with parchment. There will be enough foam for about two dozen small mounds, depending on the spoon. If you want to pipe the cookies, fit the bag and stand it in a glass with the edge folded over the rim. For a spooned batch, set out two teaspoons. Preparation is easiest now, when the foam has yet to occupy a bowl and you can still work with both hands.
Give the sugar time to disappear
Begin beating the whites at a medium-low speed. When there is a layer of loose foam on the surface, add the cream of tartar and keep mixing. The foam will start to look more even and leave ridges around the edges. Lift the whisk and check. At the point when a little peak rises and tips over, begin adding the sugar. This keeps a large pile of dry sugar from sitting at the bottom of the bowl while the whites are still thin.
Sprinkle in the sugar by the spoonful, giving each portion time to disperse before the next. Add it along the side where the whisk can draw it in without throwing it up the wall. When about half has gone in, scrape down any damp sugar that is clinging to the bowl. Start the mixer again and keep adding slowly. The mixture will turn shinier and hold the lines of the whisk for longer. Switch the mixer off briefly near the end and see whether the peak still folds at the base or only bends at the very tip.
A little foam rubbed between clean fingers should feel smooth, with almost none of the original grit. Wash your hands after the check and discard the sample. A glossy mixture with a strong peak and a few remaining grains is usually close. Give it another short whisk and check again. When the peak can stand and the mixture still looks supple, stop. A foam beaten far past that stage may go dry and lumpy and become difficult to portion evenly.
If the whites are taking a long time to expand, stop and look for a simple reason. The beaters might be skimming above the liquid in too wide a bowl, or a carton intended for other uses may produce little volume. Transferring to a narrower clean bowl can help when the beaters have barely reached the whites. If fat has got into the mixture before it foams, a clean bowl and a fresh measure are the reliable way to start again.
Shape for the kind of bite you want
Anchor the parchment with a tiny dab of foam under each corner. For a crisp center, make mounds about the size of a walnut, with plenty of room between them. Slide the foam off one spoon with the other and draw up gently at the end if you want a small peak. With a piping bag, hold the tip just above the parchment, squeeze in place, and release the pressure before lifting. A folded paper towel under your wrist can make it easier to repeat the same height along the row.
Shape matters even with the same weight of foam. A broad, low mound has a short distance for moisture to escape. It may dry before a high mound with a narrow base. Leave one of each at the front of the tray if you want to compare. A cookie with the most symmetrical top can hide a softer interior than its flatter neighbor, even though both look ready to lift from the paper.
Leave some ridges in the spooned shapes. Once baked, the ridges are the first part you touch and the first part to break. Fine piping gives more of them. A simple mound has fewer points to chip when you pack it in a tin. If you are planning to crush the cookies over fruit, make a row of low mounds and spend the extra time on getting the height even. Uniform thickness helps them finish together.
Let the oven finish the center slowly
Bake on the middle rack for about ninety minutes, then test a small cookie. A ready meringue should loosen from the paper without leaving a wet mark and feel very light when lifted. If the undersides cling, give the tray another fifteen minutes and check again. Avoid opening the oven every few minutes. Each check releases heat, and the middle may still feel soft while the cookies are hot.
Turn off the oven when the cookies lift cleanly and leave them inside to cool with the door closed. Give the tray at least an hour, longer if the mounds were large. The dry heat left in the oven gives moisture a little more time to leave the center. Break one open once cool. The shell should fracture easily, with a fine, pale web inside. A small chewy spot is pleasant if you will eat the tray soon. For an entirely crisp cookie, give that shape a little longer in the oven next time.
Color is a separate question. The surface can pick up a hint of beige around the base without affecting the flavor very much. A darker tray or a hot oven can toast the sugar earlier than expected. If the tops begin to tan well before the cookies release, reduce the temperature a little and keep drying. Take a note for the next batch, especially if the lowest mark on your oven dial is hard to read.
Keep the crispness until dessert
Put fully cooled, dry meringues in a clean airtight tin. If you leave them on the counter in a humid kitchen, the thinnest points can turn sticky while the center is still crisp. Layers of parchment between rows protect the tops when the tin moves. A cool, dry room is a better home for plain meringues than a refrigerator, where moisture can collect on them when the tin is opened.
For a quick dessert, spoon cool cooked fruit into a bowl and crumble one or two meringues over it at the last moment. Leave a few large fragments among the finer crumbs so the crunch lasts past the first spoonful. A dollop of plain yogurt makes a tangy contrast if the fruit is sweet. Serving the components separately can be useful when the bowl is going around a table slowly. The last person then gets the same crisp edges as the first.
Save an intact cookie from the test row for the next day. Pick it up by its edge and see whether the tip still feels dry. Break it across the middle. If the sound and center are what you wanted, record the approximate size as well as the baking time. The size of the next spoonful is a detail you can control long before the oven has anything to say about it.